Online Help
![]() ActivMan
ActivMan
![]() New Features
New Features
![]() Components
Components
![]() Quick Start
Quick Start
![]() Multiple Sites
Multiple Sites
![]() Main Application
Main Application
![]() Create a new user
Create a new user
![]() Create a new group
Create a new group
![]() Create a new template
Create a new template
![]() Create a new network connection
Create a new network connection
![]() Create a new database connection
Create a new database connection
![]() Using tags
Using tags
![]() Using functions
Using functions
![]() Modify existing users
Modify existing users
![]() Extracting students from MIS
Extracting students from MIS
![]() Importing users
Importing users
![]() Apply Template
Apply Template
![]() Get Missing IDs
Get Missing IDs
![]() Options
Options
![]() Usage
Usage
![]() Using actions when importing
Using actions when importing
![]() AutoImport
AutoImport
![]() Introduction
Introduction
![]() Configure
Configure
![]() Usage
Usage
AutoImport - Installing and configuring the AutoImport to send over a split admin-curric network
The principle of the AutoImport application is to extract the necessary data from your MIS and update your Active Directory accordingly. To achieve this the application MUST be able to connect to the MIS database AND the Active Directory server.
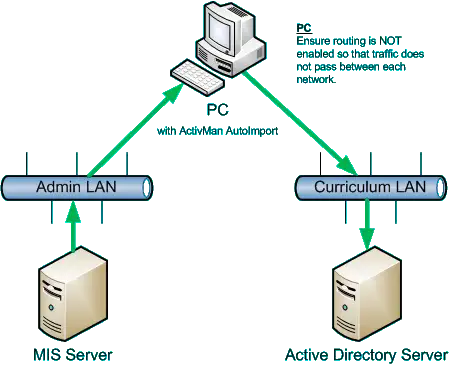
Please follow these steps in order to successfully extract and update Active Directory over a split admin-curric network with a joined PC:
- Configure a PC that has two network cards in it. One that attaches to the admin network and the other attaching to the curric network. Ensure you can access resources on both networks. NOTE: DO NOT allow routing on this PC!
- Install the ActivMan main application onto this PC (AutoImprot is installed as part of the main application).
- On the MIS tab, enter the necessary credentials to access your MIS database.
- Select the type of the database your are extracting from.
- To use Windows Authentication, leave the username and password fields empty. The current user will then be used.
- Select the 'Extract' tab.
- Select the years and/or staff that you wish to extract from your MIS. If your MIS supports 'Admissions' then you can specify this too by selecting "[Admissions]" and clicking 'Select Admissions'.
- Select the 'Settings' tab.
- You now need to enter each year that you wish to create accounts for, i.e. Year 7, Year 8, etc.
- Click 'Add'
- Select the year to be imported.
- Select a template to be associated with this year. This template must be created from the main ActivMan application. NOTE: Each year can use the same template if necessary.
- Select the Active Directory server from the list that this account will be created on.
- Browse for a desired OU on the specified server where these accounts will be created.
- Click 'OK' to save the year.
- Repeat this process for all the years you are going to import.
- Select the 'Options' tab and specify any desired settings.
- Click 'Apply' to save the settings.
- On successfully connecting to the server you are now ready to go. You can either 'Run Now' or schedule this program to run at a future time.
To schedule the AutoImport application to run at any time you wish by create a standard Windows scheduled task (this will vary depending on the operating system):
- Open Windows Scheduler
- Create a new task
- Select the ActivMan AutoImport executable
- ActivMan AutoImport does not requrie any additional arguments
- Select the desired date/day/time for the schedule to run
- Click 'OK' to create the schedule. It will now run at the specified date/time.
Configurations
For detailed configurations please see ActivMan Server Usage.