Online Help
![]() ActivMan
ActivMan
![]() New Features
New Features
![]() Components
Components
![]() Quick Start
Quick Start
![]() Multiple Sites
Multiple Sites
![]() Main Application
Main Application
![]() Create a new user
Create a new user
![]() Create a new group
Create a new group
![]() Create a new template
Create a new template
![]() Create a new network connection
Create a new network connection
![]() Create a new database connection
Create a new database connection
![]() Using tags
Using tags
![]() Using functions
Using functions
![]() Modify existing users
Modify existing users
![]() Extracting students from MIS
Extracting students from MIS
![]() Importing users
Importing users
![]() Apply Template
Apply Template
![]() Get Missing IDs
Get Missing IDs
![]() Options
Options
![]() Usage
Usage
![]() Using actions when importing
Using actions when importing
![]() AutoImport
AutoImport
![]() Introduction
Introduction
![]() Configure
Configure
![]() Usage
Usage
![]()
ActivMan AutoImport
MIS Server
Select your MIS server from the drop down list.
Extract
This section contains the settings for what to extract from the MIS server.
Years
Select the years to extract from your MIS server.
To select an admissions group select '[Admissions]'.
Admissions
With '[Admissions]' selected from the years list select 'Select Admissions' to select the admissions group.
The Admissions dialog will display all the admissions groups from the specified MIS server.
NOTE: You MUST have entered valid MIS server settings to be able to view/select a valid admissions group.
When opening the Admissions dialog for the first time the list will display "Connecting to server...".
The list will be populated with all the admissions groups upon successfully connecting the your MIS server.
If an error occurs whilst attempting to connect the the specified MIS server an error message will be displayed.
Extract UDFs
If you require UDFs to be extracted from your MIS, then select 'Extract UDFs'.
Test Only
If you would like to see what will be imported without actually modifying your Active Directory,
then select 'Test only'.
Settings
Each year you would like importing MUST exist in this list. Each year can then have a different template assigned to it, as well as residing on a different server.
Creating a new year
To create a new year simply click 'Add' from the 'Settings' tab.
Now select a year, a template (using '...' button), a server, and an OU. NOTE: You must select a server before attempting to select an OU.
Click 'OK' when finished.
Editing a year
To edit a year simply double click on the desired year from the list from the 'Settings' tab.
Deleting a year
To delete a year simply select the desired year from the list and click 'Remove' from the 'Settings' tab.
Teaching Sets
Search for Teaching Sets
Select 'Yes' if you would like to search for teaching sets.
Enabling this option will look for existing teaching sets before trying to create a new one.
If you would like to extract and synchronise teaching sets then select this option.
Create new teaching sets in
If selected, any teaching sets needing to be created will be created in the specified OU.
This OU will also be used to look for existing teaching sets too.
Create Teaching Groups As
When teaching groups are creating during the import process they will be created as specified here.
If you select 'Security and Distribution Groups' then two groups will be created but will have "_SG"
and &qout;_DG" appended to their name, respectively.
Create Teachers of Student Groups
Select 'Yes' if you would like to create and manage 'teachers of student' groups.
Groups
Year Groups
Create Year Groups
Selecting this option will create an AD group for all years that you import.
So, for example, if you import any year 9 students then a group will be created named "Year 9" and the students added to it.
Server and OU
If ActivMan needs to create a new year group, as it does not already exist, then you must specify where the new groups will be created.
So select a server and and OU accordingly.
Type and Scope
For all year groups that ActivMan needs to create you will need to specify the type and scope of these groups.
Search for Year Groups
If year groups might not be located in the specified OU then tick this option to search all of your AD for the year group.
Any group found matching the same name will be used.
Format
For all year groups that ActivMan needs to create you will need to specify the format of the name of the group.
For built-in groups (years 1 - 14) you will need to specify the format of the name.
By default this is "Year %d", where %d will be replaced with the year number.
For any custom groups entered these will be used as-is.
Registration Groups
Create Registration Groups
Selecting this option will create an AD group for all registration groups that you import.
So, for example, when you import students then a group will be created named the same as their registration group, and the student added to it.
NOTE: Only registration groups present in the extracted student's will be used.
Server and OU
If ActivMan needs to create a new registration group, as it does not already exist, then you must specify where the new groups will be created.
So select a server and and OU accordingly.
Type and Scope
For all registration groups that ActivMan needs to create you will need to specify the type and scope of these groups.
Search for Registration Groups
If registration groups might not be located in the specified OU then tick this option to search all of your AD for the group.
Any group found matching the same name will be used.
Options
Delete 'left' students
If selected, any users detected as being 'left' are deleted.
Disable 'left' students
If selected, any users detected as being 'left' are disabled.
Move 'left' students
If selected, any users detected as being 'left' are moved to the specified OU.
Remove user from member groups
When selected, when a user account has been disabled or moved the user will be removed from all groups it is a member of,
excluding it's default group, e.g. 'Domain Users'.
Move accounts to this site
Select this option to move accounts which are found in another site's OU to "this" site's OU.
The accounts will be re-enabled if they have been disabled.
Options
Move data to this site
Select this option to move users' data which is on another site's server to "this" site's server.
The template currently selected will be used to specify the destination location and share options.
Move accounts to the specified OU
If you would like to move existing accounts to the specified OU then check this option.
Create
Select whether you would like to create user accounts, groups, or both from the 'Create' drop down list.
Email Password List Settings
Select whether you would like to create user accounts, groups, or both from the 'Create' drop down list.
Email Password List Settings
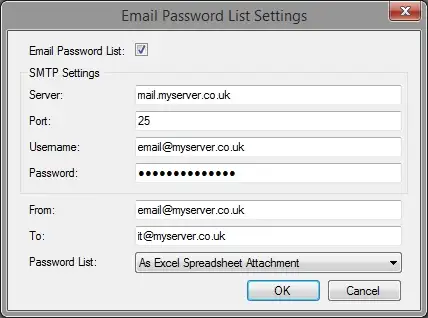
Email Password List
Enable this option if you would like th password list to be emailed to someone at the end of each extraction/import.
If you are generating random usernames and/or passwords then this option needs to be enabled otherwise you will not know the new account names and passwords.
To
You can enter here who the email will be sent to.
If you would like to specify multiple email addresses then separate them with semi-colons, i.e. "it@myserver.co.uk;dave@myserver.co.uk;rodney@myserver.co.uk".
Password List
Select the desired option of how the list will be sent.
Excel spreadsheet and CSV options will attach the specified file to the email.
"Embedded" will add a table in to the email body containing the password list.
See also: